|
Welcome to "THIS OLD TARDIS"- the time and space machine repair tutorial!
I recently got an E-mail from Starkitty, telling me how he repaired a pretty beat up Denys Fisher TARDIS and the tricks he used to do it. I thought he did a bang-up job, and asked him if I could post it here for anyone else who might have be able to use his ideas for repairs! |
|
|
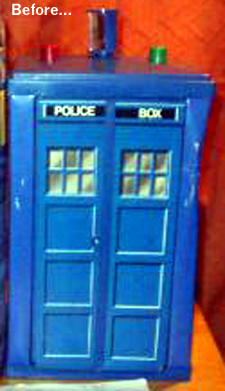
The problems
Starkitty purchased one of the vintage TARDIS' made by Denys Fisher/Mego, but it had seen better days. At some point in it's history it had became wet and the structure was failing (perhaps it materialized in the Thames and attempted to open it's doors to flood the Masters TARDIS out?).
It also suffered from rub marks on it, and two of the sides were crushed inward. He tried to push
them out, but they would not re-form. The attempt also made further surface cracks in the artwork to appear. :(
|
|
The solutions...
Here's his E-mail:
"Rick,
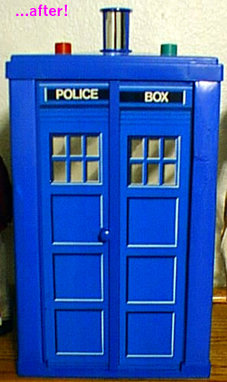
I emailed you a while back asking advice on repairing my Denys Fisher TARDIS. I thought you might enjoy seeing some “Before and After” pictures as well as a brief explanation of my repair process.
I was able to gain access to the TARDIS by removing the bottom base. I had to clip the two black pins that hold it in from the bottom (Amazingly, they “popped” back in place once I was finished with the repairs).
While I had the bottom off, I decided to fix the “twirl” mechanism located inside the TARDIS, which was broken as well.
I ended up shoring the two damaged sides with foam core on the inside and I kept the original cardboard picture on the outside. I painted the foam core dark blue so when the TARDIS was opened, it would not be obvious that they were replacements.
I used glue and the pre-existing overlapping folds within the TARDIS to shore the damaged sides to the foam core. There are folds in the cardboard that create a triangular shape on either side of the doors. I was able to “tuck” the foam core under these folds, which added the additional support the corners required.”
In order to conceal the “spiders” and “wear marks” on the outside cardboard of the TARDIS, I had to purchase an engineering / architectural pen
with a super, super fine point of similar color. With this, I could get right into the cracks of the cardboard, etc.
Lastly, the “chrome” within the light of the TARDIS was badly decomposed. I located chrome sticky paper. So, I removed the original stickers and replaced them with the new (after tracing the size from the original onto the new stickers).
Overall, I would say that it was a successful restoration!"
Great work, Starkitty!
|
|